There are few household emergencies more disruptive than waking up to an icy shower. When your water heater fails, the immediate reaction is often panic, followed closely by a scramble to find a replacement or repair service. In these moments, the fine print of a manufacturer’s warranty becomes incredibly important, yet it is often the last thing on a homeowner’s mind until it’s too late.
Rheem is one of the most recognizable names in the water heating industry, known for producing reliable, energy-efficient units found in millions of homes across the country. But purchasing a water heater is a significant investment, and understanding the protection that comes with that investment is crucial. Does a Rheem warranty actually cover the costs that matter? How does it stack up against competitors like A.O. Smith or Bradford White?
This guide breaks down exactly what a Rheem water heater warranty entails, helping you decide if this trusted industry giant offers the peace of mind you deserve.

Overview of Rheem’s Manufacturer Warranty
Rheem offers a variety of warranty tiers depending on the specific model you purchase. Generally, their residential tank water heaters fall into three main categories regarding coverage duration: 6-year, 9-year, and 12-year warranties.
It is important to understand that a “12-year warranty” does not usually mean the entire unit is covered for free replacement for a decade and a half. The warranty is typically split into three distinct areas: the tank, the component parts, and labor.
Coverage Breakdown
- The Tank: This is the core of the warranty. If the glass-lined steel tank develops a leak due to a defect in materials or workmanship within the coverage period (6, 9, or 12 years), Rheem will generally provide a replacement water heater.
- Component Parts: This covers the functional parts of the heater, such as the gas valve, burner assembly, thermostat, or heating elements. These parts typically share the same warranty duration as the tank.
- Labor: This is where many homeowners get caught off guard. Standard Rheem warranties typically cover labor costs for only one year. After the first year, if a part breaks, Rheem may send you the free part, but you will have to pay a plumber to install it. Note that some premium “Performance Platinum” models may have extended labor warranties (up to 3 years), but this is the exception, not the rule.
What Is NOT Covered?
Manufacturer warranties are designed to cover defects, not normal wear and tear or environmental damage. Common exclusions found in Rheem’s fine print include:
- Sediment and Scale Buildup: If hard water ruins your element or causes the tank to overheat and crack, this is often considered a maintenance issue, not a defect.
- Thermal Expansion: If you have a closed water system and do not have a thermal expansion tank installed, the fluctuating pressure can damage your water heater. This damage is frequently excluded from warranty coverage.
- Dry Firing: Turning on an electric water heater before the tank is full of water will burn out the element instantly. This is considered improper installation.
- Anode Rods: These are “sacrificial” rods designed to corrode so your tank doesn’t. They are maintenance items and are generally excluded.
How to Make a Warranty Claim
If you suspect your Rheem unit is failing under warranty, follow these steps:
- Locate Your Serial Number: You can find this on the rating label sticker on the side of the water heater.
- Verify Status: Visit the Rheem website and use their warranty verification tool. You will need the serial number to confirm if the unit is still within its coverage period.
- Contact a Pro: While you can call Rheem directly, it is often faster to contact a licensed plumber or the installer. They can diagnose the issue, confirm it is a warrantable defect, and handle the paperwork and parts exchange with a local distributor.
Get a Free Water Heater Installation Quote in Indianapolis ✨
Rheem vs. The Competition
Rheem is a market leader, but how does its protection compare to other big players like A.O. Smith, Bradford White, and Kenmore?
Rheem vs. A.O. Smith
A.O. Smith is a direct competitor often found at Lowe’s (whereas Rheem is Home Depot’s primary brand).
- Similarities: Both offer the standard 6, 9, and 12-year tiered system. Both exclude anode rods and sediment damage.
- Differences: The warranty terms are nearly identical in the residential sector. The choice often comes down to availability in your area. If your local Home Depot stocks Rheem parts, a Rheem unit might be easier to service quickly than an A.O. Smith unit.
Rheem vs. Bradford White
Bradford White is unique because their units are typically sold only through licensed wholesalers to professionals, not directly to consumers at big-box stores.
- The Pro Factor: Bradford White warranties are solid (often 6 or 10 years), but because they are “pro-only,” homeowners cannot easily walk into a store to buy a replacement part. You almost always have to go through a plumber.
- The Rheem Advantage: Rheem parts are widely available to the public. If you are a handy homeowner, you can buy a Rheem element or thermocouple off the shelf and fix it yourself, which is a significant advantage for Rheem regarding long-term ownership costs.
Rheem vs. Kenmore
Kenmore water heaters have historically been popular, but the brand landscape has drastically changed.
- Licensing: Kenmore appliances are often manufactured by other companies (rebranded). In the past, many Kenmore water heaters were actually made by A.O. Smith or Rheem.
- Service Limitations: Since Sears has reduced its retail presence significantly, finding direct support or specific “Kenmore” parts can sometimes be more frustrating than dealing with a direct manufacturer like Rheem.
Analysis: Is a Rheem Water Heater a Good Buy?
When weighing the warranty against the performance, is Rheem the right choice for your home?
The Pros
Accessibility: Rheem’s presence in major retailers means that warranty replacements and parts are rarely far away. In a no-hot-water emergency, speed is everything.
- Reliability: Rheem consistently ranks highly for durability. The “Performance Platinum” series, in particular, offers high efficiency and smart features (like WiFi monitoring) that can alert you to leaks before they become disasters.
- Clear Terms: While no warranty is perfect, Rheem’s documentation is generally transparent about what is and isn’t covered.
The Cons
- Labor Costs: Like most manufacturers, the one-year labor limit is a pain point. If your tank fails in year four, you get a free tank, but you might pay $400+ for a plumber to install it.
- Strict Exclusions: Rheem is strict about installation codes. If your unit wasn’t installed perfectly (e.g., missing a drain pan or expansion tank where required), they may deny a claim.
Verdict
A Rheem water heater is an excellent buy for most homeowners. While their warranty terms are standard for the industry rather than exceptional, the brand’s reliability and the widespread availability of parts give it a distinct edge. You are buying into an ecosystem where service and replacement are straightforward, which is exactly what you need when the hot water stops flowing.
However, the best warranty is one you never have to use. Ensure your new unit is installed by a licensed professional who adheres to all local codes—this is the best way to ensure your warranty remains valid for the long haul.
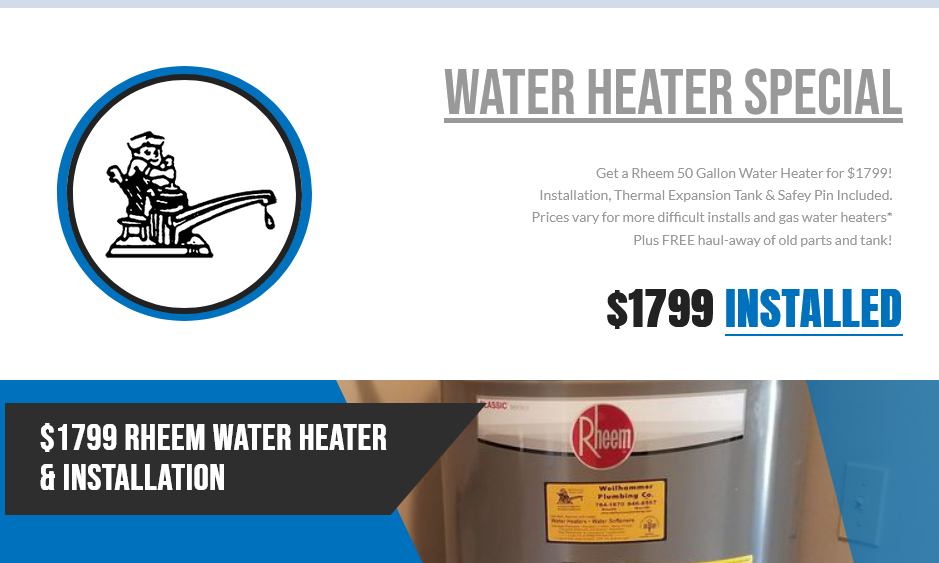
Need a new water heater in Indianapolis? Don’t let a cold shower ruin your morning. For a limited time, Weilhammer Plumbing Company is offering a brand new Rheem 50 Gallon Water Heater for just $1799! This offer includes professional installation, a thermal expansion tank, and a safety pin to ensure your home is safe and code-compliant.
Click here to claim this special offer and restore comfort to your home today.
Related Post: Is it Time for Me to Buy a New Hot Water Heater?