Water softeners work quietly in the background, transforming hard water into the soft, gentle water your home needs. This continuous operation protects your plumbing, extends appliance life, and improves your daily water experience. However, like any hardworking system, your water softener requires regular maintenance to perform at its best.
Neglecting routine care can lead to decreased efficiency, water quality issues, and ultimately, expensive repairs or premature replacement. Understanding what your water softener needs—and when—empowers you to prevent problems before they start.
TL;DR: Regular water softener maintenance prevents costly repairs and extends your system’s lifespan. Check salt levels monthly, clean the resin bed every few months, sanitize your system periodically, and schedule professional inspections annually. These simple steps keep your water soft and your plumbing protected.
Key Takeaways:
- Check salt monthly and keep the brine tank at least half full to ensure proper regeneration.
- Watch for salt bridges by testing with a broom handle if the tank looks full but water feels hard.
- Clean the resin bed every few months with a specialized cleaner to maintain ion exchange efficiency.
- Sanitize your system when needed to prevent bacterial growth, especially after extended shutdowns.
- Schedule annual professional maintenance to catch hidden issues before they become expensive problems.
Table of Contents:
- How Often Should You Check Your Salt Levels?
- What Are the Signs Your Resin Tank Needs Cleaning?
- Why Is It Important to Sanitize Your Water Softener?
- When Should You Schedule Professional Maintenance?
- Frequently Asked Questions (FAQ)
- Quick Recap
- Book Water Softener Service in Indianapolis
How Often Should You Check Your Salt Levels?
Check your water softener’s salt levels once a month. Keeping the brine tank at least half full ensures your system can properly regenerate and continue softening your water effectively. The regeneration process relies on a concentrated brine solution to recharge the resin beads that remove hardness minerals. Without adequate salt, this critical cycle can’t complete successfully, and hard water problems will return.
While monthly checks work for most households, your specific needs may vary based on water hardness, household size, and how frequently your system regenerates. Systems with demand-initiated regeneration typically use salt more efficiently than those on fixed schedules.
Understanding Salt Bridges and Mushing
During your monthly inspection, don’t just glance at the salt level—check for two common problems that can silently sabotage your softener’s performance.
Salt bridges occur when a hard crust forms in the brine tank, creating an empty space between the water below and the salt above. This prevents the salt from dissolving properly, even though the tank appears full. High humidity, temperature fluctuations, or using the wrong type of salt typically cause bridging. Test for a salt bridge by gently pushing a broom handle into the salt—if it breaks through a crusty layer, you’ve found the problem.
Salt mushing is more problematic. This happens when dissolved salt recrystallizes at the bottom of the tank, forming a thick sludge that blocks water flow and prevents proper regeneration. If your broom handle test doesn’t reveal a bridge but your water is still hard, mushing is likely the culprit.
To prevent both issues, use high-quality salt pellets rather than rock salt, avoid overfilling your brine tank (keeping it half full is ideal), and maintain appropriate humidity levels around your softener.
What Are the Signs Your Resin Tank Needs Cleaning?
Your resin tank needs cleaning when you notice reddish-brown discoloration of the resin beads, decreased water pressure, a metallic taste in your water, or when your system requires more frequent regeneration cycles.
The resin beads inside your water softener are the workhorses of the ion exchange process, capturing calcium and magnesium ions that cause hardness. Over time, these beads can become coated with iron, sediment, and organic compounds that reduce their effectiveness.
Iron fouling is particularly common in areas with well water. When ferrous iron (the dissolved form) oxidizes to ferric iron, it precipitates onto the resin beads as rust-colored deposits. These deposits block exchange sites, reducing your softener’s capacity and allowing hard water to pass through untreated.
Maintaining Your Resin Bed
Clean your resin bed every few months by adding a manufacturer-recommended amount of water softener cleaner to the brine well, then manually initiating a regeneration cycle. The cleaner flushes through the resin during the normal regeneration process, removing accumulated iron, heavy metals, and organic compounds.
Products specifically designed for resin cleaning—such as those containing citric acid or other chelating (ion-grabbing) agents—work more effectively than household cleaners. Never use harsh chemicals like vinegar, bleach, or acid cleaners on the resin itself, as these can damage the beads and reduce their lifespan.
If you have high iron levels in your water (above 0.3 mg/L), consider installing a dedicated iron filter upstream of your softener. This protects your resin investment and maintains consistent softening performance.
Why Is It Important to Sanitize Your Water Softener?
Sanitizing your water softener prevents bacterial growth that can develop in the warm, moist environment of the resin tank, which regular regeneration cycles don’t eliminate. Water softeners create ideal conditions for microorganisms to thrive. While the salt backwash cycle effectively recharges the resin beads, it doesn’t disinfect them. Over time, bacteria and algae can colonize the resin bed, producing unpleasant odors, affecting water taste, and potentially creating health concerns.
You should sanitize your water softener whenever the valve body has been exposed to air during service, after the system has been idle for more than a week, if you notice a foul smell or metallic taste in your water, or according to your manufacturer’s recommended schedule (typically every three months to annually).
Sanitization Methods
Sanitization approaches vary by manufacturer. Some systems use specialized sanitizing packets that are pre-measured and easy to use—simply empty one into the brine tank and allow the next regeneration cycle to distribute the sanitizer throughout the system.
If your manufacturer recommends bleach, exercise caution with quantities. A general guideline is approximately ¼ cup (2 fluid ounces) of unscented household bleach per cubic foot of resin for most residential softeners. Add the bleach to the brine well, run a manual regeneration cycle, and allow the bleach solution to contact the resin beads for about an hour. Follow with an additional regeneration cycle to thoroughly rinse away any remaining bleach.
Important: Using too much bleach or leaving it in contact with the resin for extended periods can damage the beads. Always consult your owner’s manual for specific recommendations for your model, as procedures and safe concentrations vary.
Never use harsh chemicals on your softener’s exterior components—mild soap and warm water are sufficient for cleaning the outside of the unit.
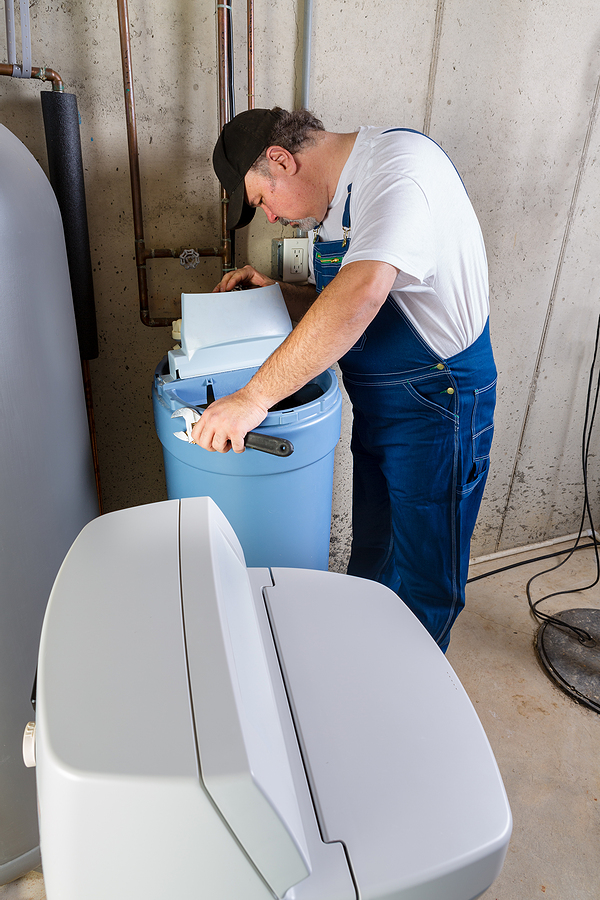
When Should You Schedule Professional Maintenance?
Schedule professional water softener maintenance annually to identify and address issues before they escalate into costly repairs or system failure. While you can handle routine tasks like checking salt levels and adding resin cleaner, a trained water softener repair service brings expertise and specialized tools that ensure your system operates optimally. Professional inspections become especially important around the five-year mark, when components may begin showing wear.
What Professionals Check
During a comprehensive maintenance visit, technicians inspect critical components including the control valve, venturi valve, seals, O-rings, and drain line. They verify proper regeneration timing, test water hardness levels, check for leaks, assess resin condition, and clean or replace parts as needed.
The venturi valve, which creates the suction needed to move brine during regeneration, deserves particular attention. This small but crucial component can become clogged with sand, sediment, and mineral deposits. While you can clean it yourself twice yearly by unscrewing the cover and washing the internal parts in soapy water, professionals have the experience to spot early signs of wear that might escape untrained eyes.
Professional technicians can also evaluate whether your current softener still meets your household’s needs. Changes in family size, water usage patterns, or incoming water quality may mean your system is working harder than it should—or that it’s time for an upgrade.
If your water softener has been in service for more than ten years, shows signs of significant wear, requires frequent repairs, or can no longer keep up with your household’s demands, a professional assessment helps you make informed decisions about repair versus replacement.
Frequently Asked Questions (FAQ)
How often should my water softener regenerate?
Regeneration frequency depends on your water hardness, household water consumption, and system capacity. Modern demand-initiated systems regenerate based on actual water usage, typically every few days to once weekly. Older timer-based systems regenerate on a fixed schedule regardless of need. If you notice your system regenerating daily or multiple times per day, consult a professional—this could indicate a programming issue, capacity problem, or leak.
What water hardness level requires a softener?
Water hardness above 7 grains per gallon (gpg) or 120 mg/L is generally considered hard enough to benefit from softening. However, even moderately hard water (3-7 gpg) can cause scale buildup over time. Have your water tested to determine your specific hardness level and whether softening would benefit your household.
Can I use any type of salt in my water softener?
Use high-purity salt pellets or solar salt for best results. Avoid rock salt, which contains higher levels of impurities that can lead to tank residue and maintenance issues. Some households with specific concerns, such as sodium-restricted diets, may use potassium chloride as an alternative, though it’s more expensive and less efficient. Specialty salts formulated to address iron or rust are available if your water contains elevated iron levels.
Why does my water still feel hard after adding salt?
Several issues can cause this problem. Check for salt bridges or mushing first. If the brine tank issue isn’t the culprit, your resin may be fouled with iron or other contaminants and need cleaning. Other possibilities include incorrect regeneration settings, a malfunctioning control valve, exhausted resin that needs replacement, or water bypassing the softener entirely. A professional inspection can diagnose the specific cause.
How long should a water softener last?
With proper maintenance, a quality water softener typically lasts 15-20 years. The resin bed itself may need replacement every 10-15 years depending on water quality and maintenance practices. Electronic components and valves may require service or replacement more frequently. Regular professional maintenance significantly extends system life.
Quick Recap:
- Check salt levels monthly and maintain at least a half-full brine tank
- Test for salt bridges using a broom handle if the tank looks full but water is hard
- Use high-quality salt pellets to minimize bridging and mushing issues
- Clean the resin bed every few months with a specialized water softener cleaner
- Watch for iron fouling signs: rust-colored water, metallic taste, decreased pressure
- Sanitize your system periodically following manufacturer guidelines
- Clean the venturi valve twice yearly to maintain proper brine suction
- Schedule professional inspections annually, especially after five years of use
- Never use harsh chemicals like vinegar or acid on resin beads or system components
- Consider upgrading if your 10+ year old system requires frequent repairs
Conclusion
Regular maintenance protects your investment and ensures your family continues enjoying the benefits of soft water. While these routine tasks are manageable for most homeowners, some situations require professional expertise.
If you’re experiencing persistent hard water problems, unusual odors or tastes, frequent system errors, or your water softener is approaching or exceeding its expected lifespan, it’s time to consult a professional.
Need expert water softener repair or replacement in Indianapolis? Our experienced technicians provide comprehensive maintenance, honest assessments, and quality solutions tailored to your home’s needs. Contact us today to schedule your service and keep your water softener performing at its best.
Related Post: Should You Replace Your 10-Year-Old Water Softener?